Getting Started with Robot Operating System (ROS)”
1. What is ROS?
For someone completely new to ROS, the best way to think about it is a collection of tools and frameworks which make automating robotics projects much easier. Every ROS project has a certain structure which you have to follow. Your job would be to fill in the automation code along defining how the different parts of your code are communicating with one another. Once this is done, the underlying ROS framework takes care of the actual networking and connections.
ROS also has the advantage of having a large open source community with tons of packages. This means you have a lot of prewritten code to help with your project and you don’t have to start from scratch.
Don’t worry if you are still confused, you will start to get a better understanding with some hands on experience. To get a better understanding of what ROS is and why it exists, checkout out these videos (1 , 2).
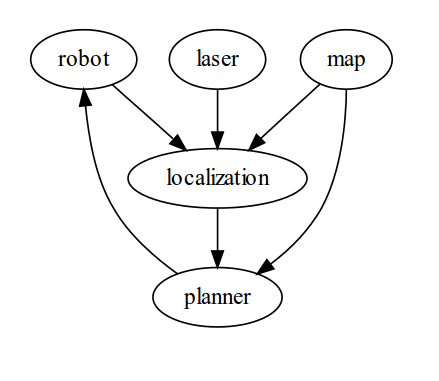
A ROS system can be visualized as a graph where all the vertices are nodes and the edges between them are known as topics. In simple terms nodes are programs that perform a particular task and send out/receive data in the form of messages. These messages are exchanged between two nodes over the topic (edge) connecting them. An example of a typical ROS system is given in the figure to the left wherein “robot”, “laser”, “map”, “localisation” and “planner” are the nodes and the arrows connecting the nodes are the topics. An arrow from A to B indicates that the topic carries messages from node A to node B.
2. Reference Material
While we have tried our best to provide a concise introduction to the basic concepts in this document, there are a lot of other much more thorough and complete resources that you should follow. This document can be treated more as a reference guide with some useful tips for beginners.
The two most useful resources you can go through are -
- Programming Robots with ROS : A Practical Introduction to the Robot Operating System by Morgan Quigley.
- ROSwiki tutorials : The official ROS tutorials.
Both of these have detailed implementation guides on the basic concepts. The ROSwiki is more concise while the book goes into more detail. We strongly recommend that you go through the first 4 chapters of the book and try out all the implementation examples yourselves. Along with these you can check out The Construct youtube videos.
3. Basic Concepts
Now let’s get familiar with some very commonly used terms in ROS development. Along with the following introduction you should go through Chapter 1 and 2 of Morgan Quigley for in depth explanation and examples.
Catkin: Catkin is the build system used for ROS. This means that after you have written all your code, defined your message files etc, you will run catkin to join everything together and compile any dependencies you have. To build packages you must have a catkin workspace where all your projects are contained. You will have to use it to build not only yours but any other packages that may be in your workspace. Click here to learn more about catkin. A catkin workspace or package can be built running either of these two commands : catkin_make or catkin build in the root of your catkin workspace.
Note : The command used for building a workspace should be consistent everytime, i.e. if the workspace was built using catkin_make the very first time while initializing the workspace, all the subsequent builds should be done using catkin_make. To change the method of build in a pre existing workspace, you can use the command catkin clean which will clear everything except the source space (src folder) of the workspace. It can then be rebuilt using the desired command.
Colcon: Colcon is another build system just like catkin. It comes with a vast array of features which can be used to organise your workspace. Similar to catkin, to build a workspace, you need to run colcon build in the root of the folder your workspace. You can check out the documentation of colcon to explore more features.
Workspace: A ROS workspace is basically a directory with a certain hierarchy wherein all your sets of related ROS codes live. A workspace contains packages which in turn contain the code for nodes amongst other things. You can have multiple workspaces on your computer but work in only one at a time. Follow this tutorial in order to set up your own catkin workspace. After following the steps in the above tutorial, upon entering your workspace directory, you will see three directories: build, devel and src.
ROS Package: All the codes and software in ROS is organised in the form of packages. A package may contain ROS Nodes, libraries used in those codes, message and service definitions and all the dependencies. Follow this tutorial to know how to create a ROS package. (Note: Follow the ‘catkin’ way instead of ‘rosbuild’). After creating the package you’ll see two files CMakeLists.txt and package.xml. We’ll be using (editing) these files many times as we proceed to work with ROS. Apart from these files there is a directory “src”. This is the place where the code for ROS nodes of the package lives (as mentioned before, nodes are nothing but programs that perform specific tasks). Once you have created your ROS package you have to build it so that you can use it. Follow this tutorial to see how to build your package.
ROS Nodes and Packages: A node is an executable file (could be python or C++) which performs a specific task and communicates with other nodes through topics. Two main ways this is done is through publisher-subscriber relationship or services. All of the programming involved in creating a ROS based project is done while writing these nodes.
Topics are the channels over which the messages of different kinds are transmitted between nodes, read this wiki to know more. ROS messages have to be specially defined for each user defined topic. Apart from the standard message types that come with ROS like string, int32, etc. you can also define your custom message types in ROS for custom uses. Refer to parts 2 and 3 this tutorial to see how you can define and use a custom message type.
Note: A single node can simultaneously act as a subscriber to one topic and a publisher of another topic and a server for one service and the client for another.
Publisher - Subscriber Model: This is a model through which two nodes can exchange data in the form of messages asynchronously, usually used when a one way stream of information is involved.
For example, suppose you are developing a self-driving car and you have a node which processes the video feed from a camera to detect street signs. Whenever it detects a sign, it needs to communicate its type and distance from the car to another node which will use this information to control the speed of the car. In this scenario your sign detection node will be a publisher which publishes data about the signs it detects to a specific topic, say signs. Your controller node will be a subscriber which will subscribe to the signs topic and perform a certain task whenever it receives a message on this topic.
- Publisher: The publisher object of a ROS node publishes the data in the form of messages over a topic. There is a particular rate (which the user defines) at which the messages get published.
- Subscriber: The data published by the publisher of one ROS node can be received or ‘subscribed’ through the Subscriber object of a ROS node. The Subscriber object subscribes to the topic over which any publisher publishes the messages. Every Subscriber object is associated with a callback function which gets called everytime a message is published over the topic.
You can check out how to implement a basic server-client for C++ or python in the ROS wiki or Chapter 3 of Morgan Quigley.
Services: Another common mode of communication, especially suited when there is a transaction style relationship between the two nodes is the service - consisting of a server and a client.
For example consider in your self driving car, you have one node to control the movement of the car and another to plan an optimal route to your destination. In such a scenario, the main control node would be the client for the route planning server. This means that whenever the controller requires a route to be planned, supposed it finds out the route is blocked up ahead, then it would send a request to the server. This request would consist of the current location, the destination as well as any preferences the controller might have (like faster/more comfortable). The server would then compute an optimal route and return it to the client as the response.
- Client: This is the node which sends requests to a server. In the client code, you can create a special function which acts as a proxy between the client and server. Whenever you call the function, it sends a request to the server with the arguments passed to it as parameters.
- Server: This node constantly monitors for requests from the client. Whenever it receives one, it carries out the required task independently of the client and sends back the response when the task is complete.
You can check out how to implement a basic server-client for C++ or python in the ROS wiki or Chapter 4 of Morgan Quigley.
4. Getting things running
Getting a complete ROS system up and running requires a bit more work than executing a single file. Check out Chapter 20 of Morgan Quigley for more detailed explanation as well as examples for all of the following tools.
ROS Master: Before running the functional nodes in your system, you should first understand ROS Master. This can be visualised as a central server to which all nodes are connected by default. It allows any node to look up information about any other node. This is essential for connecting nodes within the system. For eg. when a node (A) needs to subscribe to a topic published by another node (B), it will get the network address of node B from ROS Master.
As you might guess, a running ROS Master is necessary for every ROS system since, without it, the nodes won’t be able to connect with each other. Thus whenever you are setting up your system of nodes the first command must run in the terminal is roscore which initializes ROS Master. The ROS wiki has a section on ROS Master here or you can check out Chapter 2 of Morgan Quigley.
rosrun: Once you start the ROS Master, you can now start your own ROS nodes. For this ROS has a special command called rosrun which lets you run the executable files for your node from anywhere. The format for rosrun is -
rosrun <package_name> <executable_name>.py
(Replace
A note on node file permissions: If using python, before attempting to run any ROS nodes that you have written, make sure that you have given executable permission to the code files. For more info on linux file permission look here. The command to do this is -
chmod u+x <executable_name>.py
(Replace
A note on multiple terminal windows: Whenever you run roscore or your own ROS node, it will hold the terminal until it is killed. So if you are running multiple nodes, you will need to run each one in a separate terminal window (terminator to your rescue!).
A note on the tab key in terminal:* Typing out long commands into the terminal can get tedious. So ros has a handy capability of completing your commands for you. Whenever you are using rosrun or roslaunch, you can type out the first few letters in the package name and then press the Tab key* on your keyboard. At this point, the package name will be autocomplete, saving you a lot of typing. Try it out, this works with other terminal commands too!
roslaunch: ROS projects can involve a lot of nodes and launching them one by one can be a hassle. roslaunch is a command which lets you launch a specific set of nodes at once in a single terminal by using launch-files. These files usually contain a list of nodes and other related info and are generally stored in the ‘launch’ directory inside a package. Follow this tutorial to learn how to make a launch file.
roscd: roscd is a command line tool which allows you to navigate or ‘cd’ (change directory) to (in command line terms) a package without knowing its exact path. Note: The workspace in which the package is present needs to be sourced. E.g. If you wish to navigate into the ‘turtlebot3_gazebo’ package you’ll just type the following command in the terminal:
roscd turtlebot3_gazebo
rqt_graph: Once you have your system running, you can obtain a diagram along with other details of the system by running the rqt_graph command in another terminal window.